Questions or Comments? Click on the banner above to go to the discussion forum.


Introduction:
This guide is designed to help the beginner and intermediate airgun enthusiast to be able to completely disassemble the Crosman 1077 and gain a greater understanding its mechanical workings and components. Note: The 1077, 1077W and 1077AS all disassemble exactly the same way.
Safety:
Never disassemble a gun that is loaded and/or still has Co2 in it.
Be aware of small loaded springs when taking the main housing/receiver body apart (eye protection is recommended).
References:
The part numbers referenced in this article are from the Crosman 1077 parts table of Chambers Gun Makers. If you are unclear about any of the parts that I am describing just look them up here as I will add a part reference number to disassembly step of the rifle that I describe. Click on the diagram to expand and be able to view the part numbers. If you would like a complete parts reference, please see: Here

Required Tools:
1. 4mm Allen key/Hex wrench (Optional).
2. Medium sized Philips screwdriver.
3. Medium sized Flat-head screwdriver.
4. 2mm Allen key/Hex wrench.
5. Snap-ring/Circlip pliers (for valve disassembly only).
All the tools that you will need are pictured on the left.
Handy Things to Have:
1. Several small trays to hold parts such as screws, pivot pins and springs so they won't get lost.
2. An old rag or cloth to wipe oil off your hands and parts.
3. Clear ~A4 size or 24"x36" plastic bag.
4. China marker/Grease Pencil used when disassembling the valve.
5. Digital camera.
Preparations:
a) Be sure that you have a large enough workspace before you start disassembly!
b) Make sure you have all the Required Tools listed above or equivalents before you start.
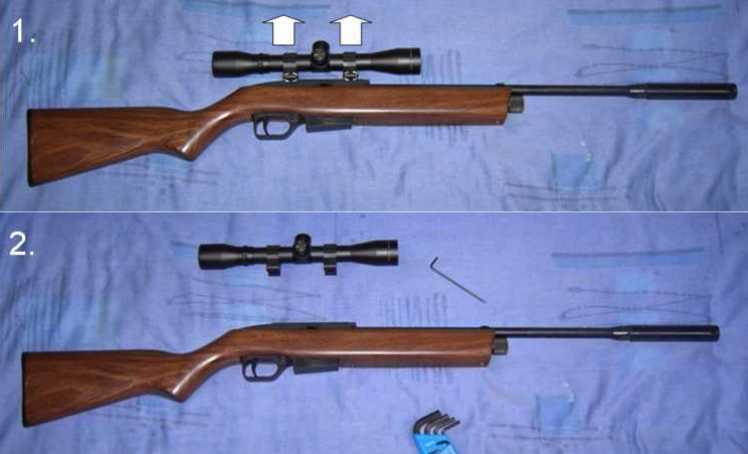
Step 1: Removing Accessories (if applicable)
You will need to get any scopes, sights or other add-on parts out of the way if attached. To do this take the 4mm Allen key/Hex wrench (Scopes usually use 4mm Allen bolts, but not always) loosen the Allen bolts on the scope ring clamps. You will not need to remove the rings. See picture below:
Step 2: Removing the Stock
Now that you have any accessories removed, you will need to remove the stock (#1077-020) from the rifle, To do this you will need to take the magazine & clip assembly (#1077-005) out of the rifle, then remove the band screw (#1077-042) and the 2 stock screws (#1077-041) located on the under side of the rifle using the Philips screwdriver. Place the screws in a safe place where they won't get lost. Remember that the larger bolt type band screw (#1077-042) is from the front most hole. Now you may gently ease the stock away from the rest of the rifle.

Step 3: Disassembly of the Magazine Housing
Before you start taking out any screws make sure that you take the 12-shot rotary magazine clip (#1077-001) out first. Next, use your Flat-headed screwdriver to remove the two frame screws (#2-041) on the left hand side and carefully ease the magazine halves (#1077-004, #1077-005) apart. This is best to do in a clear plastic bag as there is a very small index spring (#106-016) that may fly out. Once it is open and hopefully hasn't exploded everywhere, remember to take a digital photo of it or memorise it before you take any of the small parts out.
Note: Clip disassembly is not a requirement unless it requires repair.
Step 4: Opening the Action/Receiver Housing
After removing the stock it will be time to start dismantling the action/receiver housing (#1077-021/#1077-022), This will be one of the more difficult parts of the disassembly so I will split it up into multiple steps.
Step 4A: Cover
Start by turning the housing (#1077-021/#1077-022) over to it's left hand side where there is only one Screw hole near the barrel shroud receiver. Use a flat-bladed screwdriver to remove the shroud retention screw (#1077-032). Next, flip the rifle over to it's right hand side and again use the flat-bladed screwdriver to remove all the Screws (#2-041/#1077-032). Don't expect there to a screw in every hole, Crosman has been known to sometimes leave out one or two. Don't forget to put these screws in a safe place separated from the three stock screws.

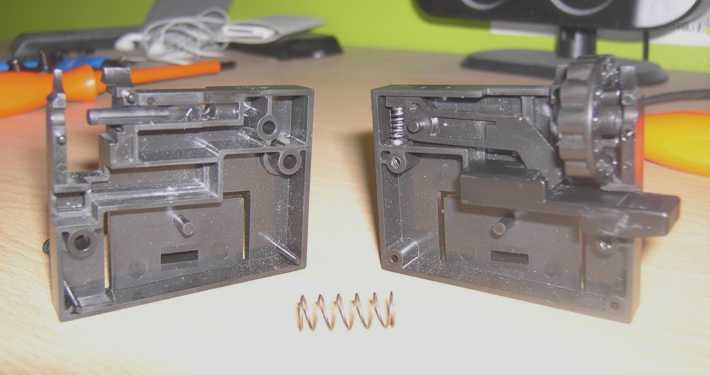
Step 4B: Separating the Action/Receiver housing
Now that all the screws have been taken out of the housing (#1077-021/#1077-022) slide everything into a clear plastic bag. The clear plastic bag will stop any potential flying springs from getting lost. Be careful not to let the housing come apart whilst sliding it into the bag. Next, slowly remove the right-hand side piece of the housing within the bag. Things that might stick or 'grab' would be the safety slide lever (#1077-040) and/or the barrel clamp (#1077-007) a bit of wiggling/fiddling will free these parts.
Step 4C: Note for Reassembly
Now that the action/receiver housing (#1077-021/#1077-022) is opened up it is important to take some time to memorise the internals or take a digital photo to be sure you can remember where everything should be place upon reassembly.

Step 5: Removing the Barrel shroud and Foresight
Now that you have the housing (#1077-021/#1077-022) open it is a good idea to get the barrel shroud (#1077-010) out of the way. Start by holding the barrel clamp (#1077-007) and the end of the barrel shroud. Then pull the Barrel shroud away from the barrel (#1077-006) and the rest of the receiver. To remove the front sight (#766B102) from the barrel shroud use a long (0.5m/18" or longer) dowel and slide it into the barrel shroud, hold the shroud with the muzzle facing upwards (away from your face) and tap the dowel firmly against the floor and the sight should come out.


Step 6: Removing the Co2 Tube, Valve and Valve Pipe
To remove the Co2 tube and/or the valve pipe you will need to remove the Co2 valve (#1077A015) at the same time. Start by lifting the tube (#1077-017) out from the housing (#1077-021/#1077-022) at the same time as the valve and the brass valve pipe (#1077-016) place it all down away from the housing. To separate the valve from the tube gently twist the valve from the pipe and then the same with the pipe from the Co2 tube.

Step 7: Removing the Trigger Assembly and Trigger Spring
Lift out the trigger assembly (#1077-033) carefully making sure that the trigger spring (#1077-014) doesn't fly out if it didn't already when opening the housing in Step 4B (#1077-021/#1077-022).
Step 8: Removing the Hammer, Hammer Spring and Hammer Pivot Pin
First use the flat-headed screwdriver to unhook the hammer spring (#106035) from the housing (#1077-021/#1077-022). Now take the hammer pivot pin (#766-044) out from the Hammer (#1077-030) and put it somewhere safe and then lift the hammer out of the housing.
Step 9: Removing the Hammer Latch, Pivot, Latch Spring and Safety
This again is another easily done step, Take the hammer latch (#1077A044) out first being careful not to move the small 'V' shaped spring (#1077-055), Now take the latch pivot pin (#1077-056) out at the same time as the 'V' shaped spring, Now that this is done just take the safety slide lever (#1077-040) out by holding the housing (#1077-021/#1077-022) with your hand and pull the safety out straight with your opposing hand, Simple!
Step 10: Disassembling the Co2 Valve
This is one of the more advance steps in this Disassembly Guide. If you are not familiar with valves or not very good with lots of little bits and pieces I advise you not to do this without direct advice from someone who knows more about the subject.
Step 10A: Separating the Valve Body (Feed Pipe)
To start you will need to take the sealing parts for the Co2 feed pipe (#1077-016) off the side of the valve (#1077A015). To do this take the valve and hold it by the ends between your thumb and index finger, and with your thumb and index finger of the opposing hand hold the ends of the bushing retainer (#1077A038) that seals the brass feed pipe to the valve (don't forget to hold the valve over a tray whilst doing this as the bushing, o-ring and a washer may fall out. If they do not fall out on their own, pull the bushing out by hand and (gently) remove the o-ring with a toothpick or small hooked pick.
Step 10B: Disassembling the Co2 Valve (Detent)
The next step is to remove the forward nose/detent that moves to allow clips and magazines to be inserted and removed while maintaining a reasonably sealed Co2 flow to the pellet. The detent body (#106A010) houses the detent assembly (#106B036 and #106A046) which is a plunger with an o-ring and spring. Use a china marker or grease pencil on both the detent body and the valve body to create a line so you can reassemble them in the same configuration later. To remove the detent use a small flat-bladed screwdriver between the detent body and the valve body (there is a small ridge there) and wiggle it off. Be careful! The spring could shoot out while attempting this. Note: Crosman has sometimes placed a washer behind the spring and often leaves the o-ring off the detent plunger.


Step 10C: Disassembling the Co2 Valve (Internals)
Now that you have the exterior valve parts removed, you can start disassembling the inners of the valve (#1077A015). To do this you will need to have a Snap-ring/Circlip plier set with you to be able to remove the c-clip (#1077-051) that retains all the valve pieces inside the body. When taking the Snap ring/Circlip out be prepared for a sudden release from the (up to now) loaded valve spring (#106-008) that is located inside the valve body (Don't worry it's not too strong, just firm).
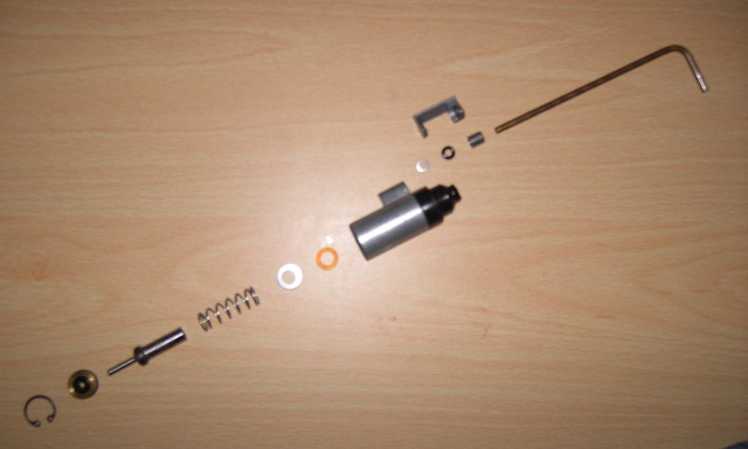
Step 10D: Disassembling the Co2 Valve (Internals, cont.)
Now that you have the Snap-ring/Circlip (#1077-051) out the way, usually all the parts of the valve will fall out. These will be simple to re-install later if you refer to the image below this paragraph, so just let them come out into a small tray where they won't get lost.